How do I setup Google Analytics in Sellr?
If you are using Google Analytics then you will want to add this functionality to your Sellr website. It's really easy to set up analytics within Sellr.
How do I get started?
There are three main steps involved when it comes to adding Google Analytics, with Sellr. First you will need to enable Google Analytics within Sellr, then you will need to verify your domain with Google, finally, you will need to add a meta tag to your Sellr website. We will go through all of the steps below:
Step1: Enable Google Analytics within Sellr
First login to your Google Analytics account. Google will provide you with a UA Code, copy or make a note of this number.
Login to Sellr and in the drop down menu at the top, click 'Marketing' > 'External Tracking Scripts' > 'Google Analytics' and enter your UA code in the box provided (include the letters UA at the start of the code) like this:

Don't forget to click the 'Save Changes' button!
Step 2: Getting the meta tag from Google
You will need to verify your site with Google, they will provide you with a meta tag to add to your Sellr homepage. You will need to sign into your Google Analytics admin console to get the meta tag. Google have instructions for obtaining the meta tag and verifying your website in the link below..
https://support.google.com/a/answer/63026?hl=en
Step 3: Adding the meta tag to your homepage
In the drop down menu at the top of the page click 'Website' > 'Edit Your Website' and then click 'Edit Primary Website'
Next, Click this icon  while on your homepage.
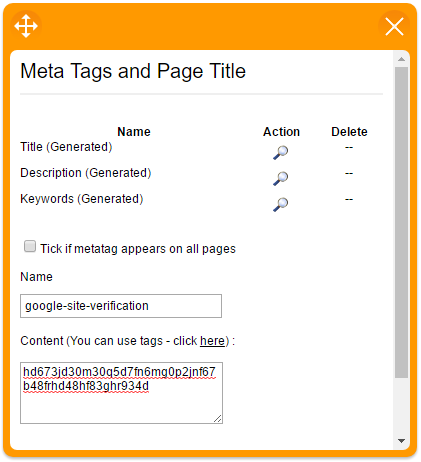
A box will pop open where you can enter a meta tag. In the name field type "google-site-verification" and in the content field paste your verification code. It should look something like this...


